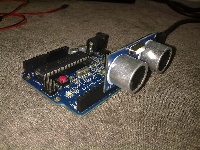
Few months back, in my mind, I needed to build up a cat/dog repellent based on Arduino circuit. But, at the same time, I needed a sensor to detect an object exists in front of the device. I bought an ultrasonic sensor suitable for arduino. There are two kind of ultrasonic sensor with different circuit pin. 3 pins or 4 pins. I got HC-SR04 which is having 4 pins, Vcc, Trig, Echo and GND.
And the most important thing was, I needed to learn how to write a program for the sensor. To learn how to write a testing program I found this site, http://www.arduino.cc/cgi-bin/yabb2/YaBB.pl?num=1272177425
 From here, I got the library specific for HC-SR04 including the program example. But, something I hate is not having a complete circuit or build a circuit on a breadboard. From the example, arduino need a LCD display, breadboard, wire and of cause, the ultrasonic sensor.
After learn the program a few minutes, I figured it out how to make the whole circuit simple and less installation. First of all, i do not need any LCD just to display the value of the range/distance captured from the sensor. It is just fine to read it from the PC via serial com.
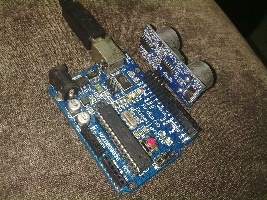
Identify the connections at the arduino for the sensor. From original circuit, Trig is placed at pin 12 of digital IO and Echo, at pin 13. Except Vcc and GND are using the power supply from supply connections 5V and GND at the other side of the arduino. Just to make it simple, as I placed the sensor straight to the connections (pin 12 & 13) without using any wire, the GND pin will be placed at GND at digital connection and Vcc at pin 11. At this moment, I must remember, to supply power to the sensor, I need to do something with pin 11. 5V is just enough to power it up. So, in my next step for the programming, I must set pin 11 as a HIGH OUTPUT equivalent to +5V. For GND, there is no different for but between GND in power supply or digital.
For the programming, I needed to rewrite the example. As I already not using an LCD, I deleted the LCD library including any function for it. It is not a compulsory as it would not give any problem to the whole circuit. But, the important thing is to add a few lines just to make pin 11 to supply +5V to the sensor. So, the program is looked like this.
#include "Ultrasonic.h"
Ultrasonic ultrasonic(12,13);
void setup()
{
pinMode(11, OUTPUT); /* Additional pin setting */
digitalWrite(11, HIGH); /* Additional pin setting */
Serial.begin( 9600 );
}
void loop()
{
Serial.print( ultrasonic.Ranging(CM) );
Serial.println( "cm" );
delay(1000);
}
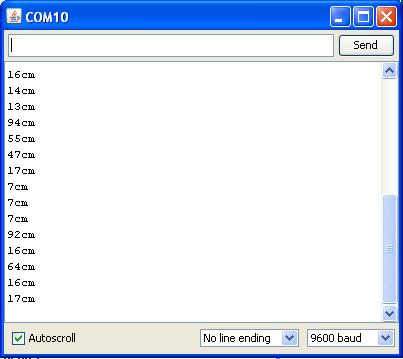
After uploading the program to the arduino, I can read the value just using the serial monitor.

I have extra HC-SR04 sensor for you to have. For Malaysian only. Just click below BUY NOW button and make the payment. We will deliver the item on the next day.
