Using ESP8266-01 module as a shield to Arduino Uno is hard to establish. I took a week to google around to get and fix several issues for this arrangement.
In this article, Arduino Uno will use ESP8266 as a shield and communicate between this devices using SoftwareSerial at uncommon pin D2 and D3. Common serial communication pin D0 and D1 will be left as debugger or for console. I will use Blynk sketch as for the programming.
HARDWARE PART
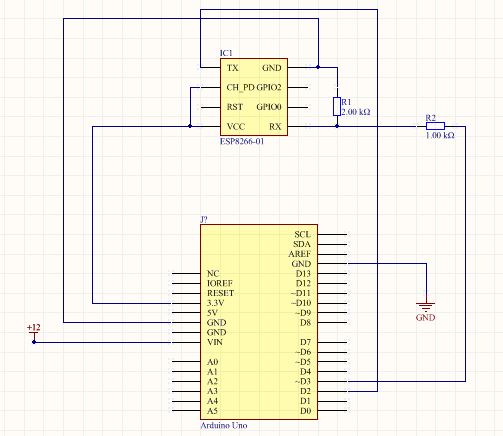
As for hardware part, the best wiring, I think, is like above picture.
1. At SoftwareSerial sketch, D2 will be Rx and D3 will be Tx. D3 can not be connected directly to Rx of ESP8266. If so, you will get error in console "ESP is not responding". I dont know why, but i guess because signal from from Arduino is 5V, higher than ESP8266 can accept. You can see R1 and R2 resistors are used as a voltage divider to get 3.3V signal for ESP8266.
2. However, there is no modification for D2 to Tx in ESP.
3. For power 3.3V for ESP, many suggested to use power from external resource. This is due to ESP not stable enough to work well. However, I found that during my experiment, I used a lot of jumper wires which loose whenever connected to breadboard, ESP and Arduino. So, need to tight the connection up firmly when I used 3.3V from Arduino to power up ESP.
SOFTWARE PART
The sketch I used is like below.
/* Comment this out to disable prints and save space */
#define BLYNK_PRINT Serial
#include <ESP8266_Lib.h>
#include <BlynkSimpleShieldEsp8266.h>
// You should get Auth Token in the Blynk App.
// Go to the Project Settings (nut icon).
char auth[] = "Blynk_key";
// Your WiFi credentials.
// Set password to "" for open networks.
char ssid[] = "wifi_ssidi";
char pass[] = "wifi_key";
// Hardware Serial on Mega, Leonardo, Micro...
//#define EspSerial Serial1
// or Software Serial on Uno, Nano...
#include <SoftwareSerial.h>
SoftwareSerial EspSerial(2, 3); // RX, TX
// Your ESP8266 baud rate:
//#define ESP8266_BAUD 115200
#define ESP8266_BAUD 9600
ESP8266 wifi(&EspSerial);
void setup()
{
// Debug console
Serial.begin(9600);
delay(10);
// Set ESP8266 baud rate
EspSerial.begin(ESP8266_BAUD);
delay(10);
//Blynk.begin(auth, wifi, ssid, pass, "192.168.0.17");
// You can also specify server:
//Blynk.begin(auth, ssid, pass, "blynk-cloud.com", 80);
Blynk.begin(auth, wifi, ssid, pass, "192.168.0.17", 8080);
}
void loop()
{
Blynk.run();
}
#####################################################
1. Above example suitable for Blynk Cloud server and local Blynk server. Check line Blynk.begin and choose by remarking it.
2. By default ESP baud rate is 115200. However, using this setting in Arduino can have error "Login timeout" and caused intermittence connection between ESP and Arduino. What I found SoftwareSerial able to work fine until baud rate 288000. For this care, I prefer to use low baud rate, 9600.
3. Error "ESP is not responding" also could occurs when blynk.begin initialise start after several function. The best sketch is writing EspSerial.begin and Blynk.begin at the end of function setup(). Other program can be written before these two. For example, you might want another SerialSoftware function. Just write it before these two.

