It is not poor but what I mean is how to flash ESP8266 using Arduino Uno as FTDI adaptor. I am not afford to buy FTDI serial adaptor.
WHAT DO YOU NEED TO FLASH ESP8266?
By default, when you buy ESP8266, it already flashed with AT firmware. The AT firmware is upgradable depending on its manufacturer or other third party. Using this firmware, external device such as Arduino board can use ESP8266 as a WiFi adaptor.
In the other case, ESP8266's firmware is easy to brick. The main reason of this issue is due to change baud rate using improper AT command. AT+UART and AT+IPR command will brick your module. Try to use AT+CIOBAUD instead next time. If bricked, need to flash back the firmware.
Because of ESP8266's hardware capabilities and ability to be re-flashed, we can write our own program and flash it to the module. The good thing is, we can write sketch using Arduino IDE.
WHAT IS THE PREPARATION?
HARDWARE
- Arduino Uno without Atmel AVR.
- ESP8266
The connection is simple.
- ESP8266-------------------------->Arduino Uno
- Vcc--------------------------------->3.3V
- GND-------------------------------->GND
- CHIP_D---------------------------->3.3V
- Tx----------------------------------->Tx
- Rx----------------------------------->Rx
- -------------------------------------->RESET---------->GND (This is to make Arduino Uno becomes dumb serial adaptor.)
SOFTWARE
For this lesson, I will show how to flash ESP8266 for upgrading the AT firmware.
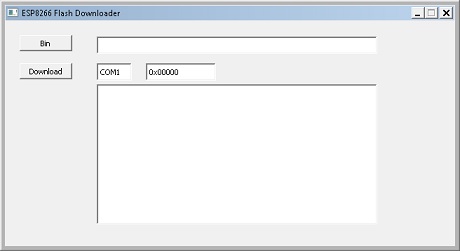
- ESP8266 Flash Downloader - This is the easiest tool that I used. I tried several tools but this tool was not disappointed me. Download it from here, https://github.com/Stadslab/ESP8266_example/tree/master/ESP8266_flasher_V00170901_00_Cloud%20Update%20Ready . But, do not use the BIN file. The firmware BIN file is not the latest.

ESP8266 Flash Downloader looks like.
- AT Firmware BIN file - I used to download from here, http://www.electrodragon.com/w/ESP8266_AT-Command_firmware . And get the combined BIN. It is easier using combined BIN file. Normally, AI-Thinker comes with combined BIN file.
Unzip both files and save them any location you prefer in the PC.
WHAT IS THE STEPS?
1. CHANGE ESP8266 TO FLASH MODE.
- Power off ESP8266. If you not power it off yet.
- Connect GPIO0 to GND.
- Power up ESP8266. Wait a second.
- Disconnect GPIO0 from GND. Then, it change to flash mode. Ready to be flashed.
What happen if ESP8266 not change to flash mode?
ESP8266 flash downloader got an error, "Failed to connect.".
If you use Arduino IDE and upload the sketch, it will get an error,
error: failed reading byte
warning: espcomm_send_command: cant receive slip payload data
....................................................................................................
error: espcomm_open failed
error: espcomm_upload_mem failed
error: espcomm_upload_mem failed
In Arduino IDE also, some will got this error.
warning: espcomm_sync failed
error: espcomm_open failed
error: espcomm_upload_mem failed
error: espcomm_upload_mem failed
This is due to speed of the ESP8266 is not the same with the setting in Arduino IDE. By default, ESP8266 is using 115200bps.
Many people forget about this issue. Please pay attention to the mode of the module.
2. READY TO FLASH.
- Connect Arduino Uno to PC. Check the Serial Com name or number. Com1? Com8?
- Execute ESP8266 Flash Downloader.
- Click BIN button and find the AT firmware BIN file.
- Change Com1 to any Comx existed for Arduino Uno.
- Click Download.
- The process will take a few minutes to complete.
- After complete, the tool will show complete status. But, there are some people reported, they got an error, unable to go to flash mode. But, it also shows the process completed at 100%. Dont worry. Its ok. Just restart ESP8266.
- If you flash AT firmware, check the module by typing in AT in console. It should replies "AT OK".
For uploading sketch from Arduino IDE, is slightly different.
- Prepare the sketch in Arduino IDE.
- Click File > Preferences. In Additional Boards Manager, add http://arduino.esp8266.com/stable/package_esp8266com_index.json. Click OK 2 times.
- To get ESP8266 board available in Arduino IDE, click Tools > Boards > Board Manager. Type "esp" and install "esp8266 by community".
- Open example sketch for esp8266 at File > Example > ESP8266 > Blink.
- Set the board by clicking Tools > Board > Generic ESP8266 module. Set the speed 115200 and Programmer to AVRISP mkII.
- Upload the sketch example. During this time, the success upload (flash) will got this status similar like this.
Sketch uses 222,217 bytes (51%) of program storage space. Maximum is 434,160 bytes.
Global variables use 31,592 bytes (38%) of dynamic memory, leaving 50,328 bytes for local variables. Maximum is 81,920 bytes.
Uploading 226368 bytes from C:\Users\ADMINI~1\AppData\Local\Temp\arduino_build_62387/Blink.ino.bin to flash at 0x00000000
................................................................................ [ 36% ]
................................................................................ [ 72% ]
.............................................................. [ 100% ]
If you plan to buy ESP8266 module, I recommend you to buy it from here, http://www.cytron.com.my/p-WIF-TRX-ESP8266?tracking=5828001c94a67 .
